
Google Photos Hidden album and how to find it
Google Photos shared albums are extremely convenient for a plethora of reasons. With it, you and other users can add photos and videos…

Google Photos shared albums are extremely convenient for a plethora of reasons. With it, you and other users can add photos and videos to a single album, comment on added photos, and get notified whenever someone adds something new. And, if you’re the owner, you can change permissions for all users. Like your own personal albums, shared albums are shown in the Library. If you want to hide them from the library, you can do that by following the instructions below.
Can you make a hidden album on Google Photos?
We need to make a quick distinction between Shared Albums that can be hidden from Library and the recently-introduced Locked Folder where you can hide your photos and videos. With that in mind, we offer explanations for both.
1. How to hide and unhide shared Albums from Library
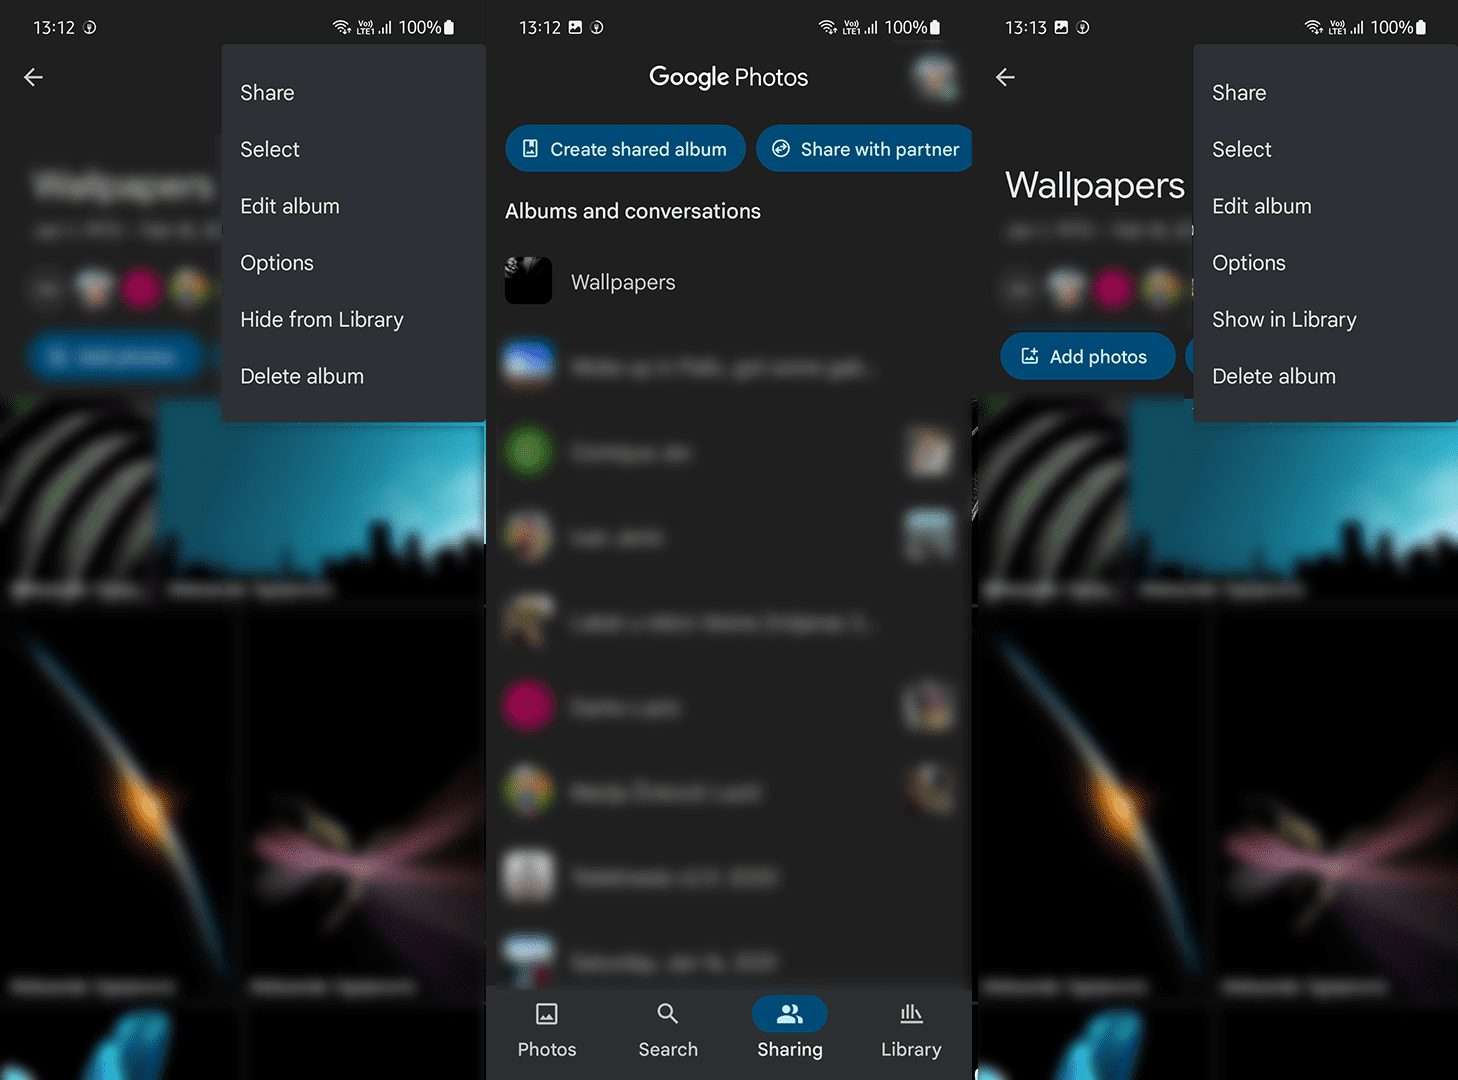
Users have the option to hide shared albums from Library and see them only under the Sharing tab in Google Photos. Cleaning some clutter if you have a lot of albums is always a good idea. Of course, this applies only to shared albums. You can’t hide personal albums, just delete them.
If you want to unhide albums, you can do that in the Sharing tab. Even if you hide the album, you’ll still see all photos and videos that the album contains in the main Photos tab (photos grid).
Here’s how to hide a shared album in Google Photos Library:
- Open Google Photos.
- Tap Library.
- Select a shared album you want to hide.
- Tap on the 3-dots menu and select Hide from Library.
- To unhide an album, open Sharing from the bottom and select the album. Tap on the 3-dots menu and choose Show in Library.

2. Use the Locked Folder to hide photos and videos in Google Photos
On the other hand, if you’re looking for a way to hide some sensitive photos and videos from search results and photos grid in safe-like cloud storage, you can do that with the recently-added Locked Folder. This feature is, at the time being, available only on Google Photos for Android. The photos and videos are stored locally and encrypted so you can only access them through Google Photos, even when offline.
To transfer photos or videos to Locked Folder, just tap on the photo (or use multi-select to choose multiple photos or videos) and tap on the 3-dots menu. From there, select Move to Locked Folder. Depending on the size (primarily of large videos), this can take some time. If you delete photos or videos from the Locked Folder, they don’t go to Trash, so keep that in mind before you delete something permanently.
Here’s how to enable and use Locked Folder on Google Photos for Android:
- Open the Google Photos app on your Android phone.
- Select the Library tab.
- Tap Utilities.
- Select Locked Folder.
- Follow the instructions to configure the Locked Folder. After that, just select photos and videos you want to keep behind a lock and move them to Locked Folder.


If you want to hide photos, videos, or other files locally, most Android skins come with App Lockers and Safe storage variations. You can use Files by Google’s Safe folder or Secure Folder on Samsung devices to keep your files out of sight and behind a security measure.
With that said, we can conclude this article. Thank you for reading and don’t forget to share your thoughts, questions, or suggestions with us in the comments section below.
Editor’s note: This article was initially published in April 2022. We made sure to revamp it for freshness and accuracy.


